why wont a png upload into davinci
There are a lot of questions on how DaVinci Resolve deals with the stills and images.
Like…
Does DaVinci Resolve support png, does information technology back up jpeg, how to make an epitome transparent, how to deal with image sequences, and many more!
Today nosotros'll run across answers to questions related to how Resolve deals with images.
Let'southward get started!
Earlier diving in, we must know the different paradigm file formats supported by DaVinci Resolve.
Pop Supported Prototype File Formats in DaVinci Resolve
| File Format | File Extension |
|---|---|
| Portable Network Graphics | png |
| JPEG | jpg |
| Adobe Photoshop | psd |
| Digital Negative | dng |
| Digital Picture Exchange | dpx |
| OpenEXR | exr |
| Nikon Electronic | nef |
| Tagged Image | tif |
For a full list of supported prototype formats, please refer Supported Codec List from BlackMagic Blueprint Support website.
Does DaVinci Resolve Back up PNG?
DaVinci Resolve supports PNG file format on MacOs, Windows, and Linux. These are withal images that also have alpha channel information for transparency.
How to Add together PNG to DaVinci Resolve?
- Launch DaVinci Resolve.
- Click on the "Media" page.
- Click on the "Media Storage" tab.
- A list of your hard disks will be displayed.
- Click on the drives to detect your png images.
- Right-click and select "Add into Media Pool".
- The png is added under your default "Master" bin (or folder).
- Now click on the "Edit" or "Cutting" page.
- Click on "Media Pool".
- Drag and drop your png into the timeline.
For more than information on editing your images, read the below stride-by-footstep guide:
Quickly Edit Images in DaVinci Resolve (Step-past-Footstep Guide)
How to Crop in DaVinci Resolve (In Less Than ii minutes!)
DaVinci Resolve is Unable to Import PNG files
In some cases, DaVinci Resolve might non be able to recognize or import png files.
If this is the case, and so the folder containing the png files could take been corrupted.
Attempt copying the pngs to a different folder and so import inside DaVinci Resolve.
How to Make an Epitome Transparent in DaVinci Resolve?
To make an paradigm transparent in Resolve, the image format (like png) should support the alpha aqueduct (which is capable of producing transparency).
Now earlier it gets also technical, let's offset sympathise…
What is an Blastoff Channel?
To put in simpler terms, an blastoff channel contains data about an prototype's colour and information technology's transparency (or opacity) values.
And then if y'all're going to work with the transparency of an image, yous have to make sure it supports alpha aqueduct.
Non all images support alpha channel.
As per BlackMagic, the following stills support alpha channel, which means you can brand them transparent every bit needed.
Prototype Formats & Alpha Aqueduct Support in DaVinci Resolve
| Image File Format | Support of Alpha Channel |
|---|---|
| tif | Yes |
| png | Yes |
| jpg | No |
| dpx | No |
| exr | Aye |
| dng | No |
| psd | No |
| tga | Yep |
A few thigs to note:
- PNG is the most used prototype format when information technology comes to making an image transparent.
- JPG doesn't support the alpha channel, which means, it can't be made transparent.
Now that y'all know which image formats back up alpha channel, the next question is:
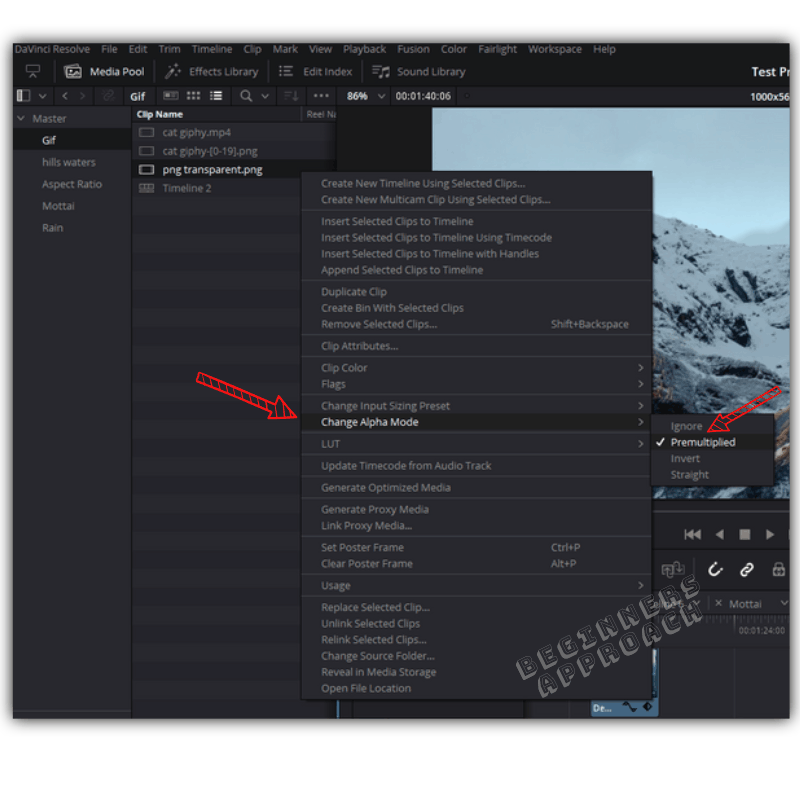
How to Brand an Image Transparent in Resolve?
- Import the png paradigm into "Media Pool".
- Right-click on the image.
- Click on the "Change Alpha Style" -> select "Premultiplied".
- Drag and drop the png into the timeline, preferably to a higher place a video track, so that yous can see your paradigm is transparent now.
Few things to note:
- If the "Premultiplied" choice doesn't work, then select "Directly" and meet. If none of the options make it transparent, and then you might have a png that doesn't have transparency information in the blastoff channel. Or…
- Sometimes there are imitation pngs, meaning, jpegs having white groundwork – there is no transparency in them. If you work with them, you can't make them transparent.
And then ensure you have a valid png file before bringing it inside Resolve.
Does DaVinci Resolve Support JPG?
DaVinci Resolve supports JPG image format. Y'all tin can import, edit, color right a JPG file similar any other clip.
JPG doesn't support alpha channel – pregnant, you won't exist able to arrive transparent.
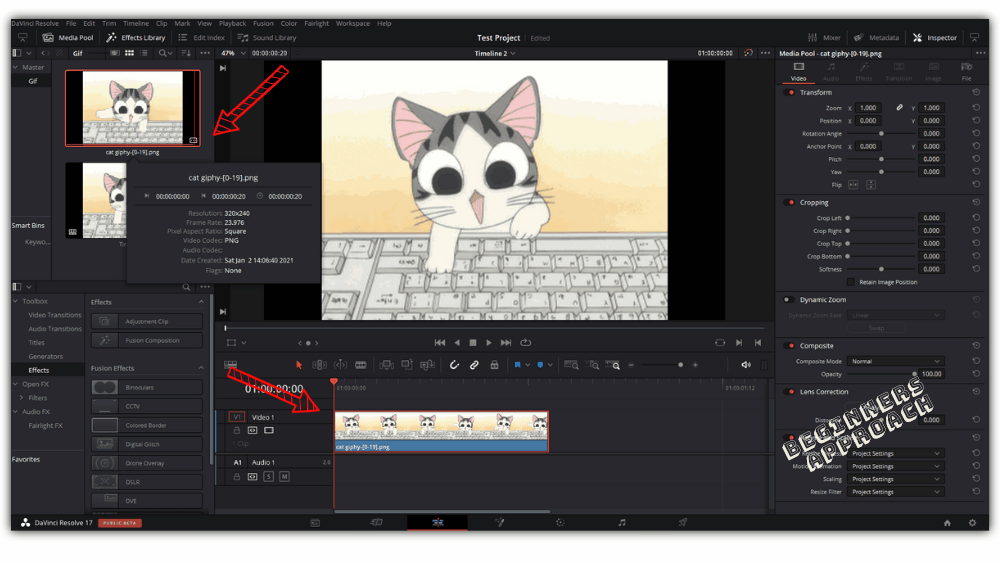
How to Import an Image Sequence in DaVinci Resolve?
Paradigm sequence is a grouping of epitome frames which are numbered or named sequentially.
Yous tin can make DaVinci Resolve treat the image sequences (like dng or png) every bit a unmarried clip or individual paradigm frames.
By default, Resolve treats the image sequences as a single clip.
This is how to import an prototype sequence into DaVinci Resolve:
- Under the "Edit" page, click on "Media Pool".
- Press "Ctrl + i" (or "Cmd + i") for importing the image sequence.
- Navigate to the desired location and select all the image sequences.
- Click on "Open up".
- The epitome sequences volition exist imported as a single clip.
Sometimes Resolve doesn't import the image sequence equally a single clip. We'll come across how to overcome this.
DaVinci Resolve Doesn't Import Image Sequence every bit a Unmarried Clip
The main reason could be the images are not sequentially named or numbered. At that place could be few images that don't take continuous numbers or are renamed differently from the other images.
Or…
You might have a grouping of images – all named differently. But you demand Resolve to treat them equally a single prune.
Either way, you'll have to sequentially number them outset and uncheck an choice in Resolve, to treat it every bit a single clip.
Here'due south how to do it.
How to Sequentially Number a Group of Images (Instantly)?
- Select all the images, either by dragging a box effectually them or press "Shift" click all the images.
- After selecting all the images, right-click on the kickoff clip and select "Rename".
- Enter a proper name, permit's say "hullo", and printing the "Enter" key.
- All the names of the images will be sequentially numbered automatically.

- Now, go to Resolve -> Media folio.
- Click on "Media Storage" from the meridian left.
- At present click on the 3 dots and brand sure "Evidence Individual Frames" is Unselected.
- Press "Ctrl + i" (or "Cmd + i") to import.
- Open the folder containing the epitome sequences.
- Select all the images and click on "Open".
- The epitome sequences volition exist imported equally a single clip.
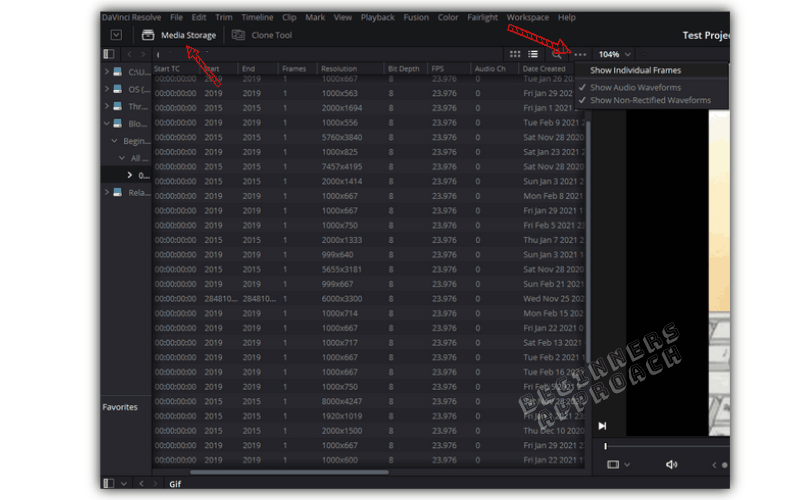
How to Brand DaVinci Resolve Import an Image Sequence as Individual Frames?
- Go to Resolve -> Media page.
- Click on "Media Storage" from the tiptop left.
- Now click on the 3 dots and brand sure "Show Individual Frames" is Selected.
- Press "Ctrl + i" (or "Cmd" + i).
- Open the binder containing the image sequences.
- Select all the images and click on "Open".
- The image sequence will be imported as individual frames.
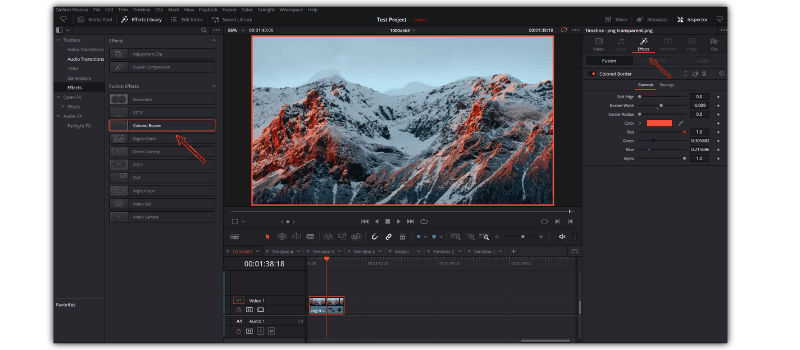
Quickly Implement a Border for an Image in DaVinci Resolve
Implementing an epitome border is very simple in DaVinci Resolve 17.
- Under the "Edit" page, Import the desired image and place it on the timeline.
- Click on the "Effect Library".
- Click on the "Furnishings" option under "Toolbox" from the left.
- Under "Fusion Effects", click on "Colored Border", and drag & drop it onto the desired image.
- Click the image on the timeline.
- Click on the "Inspector" tab -> click on "Effects" tab.
- Adjust the various settings and colors to get the edge of your sense of taste!
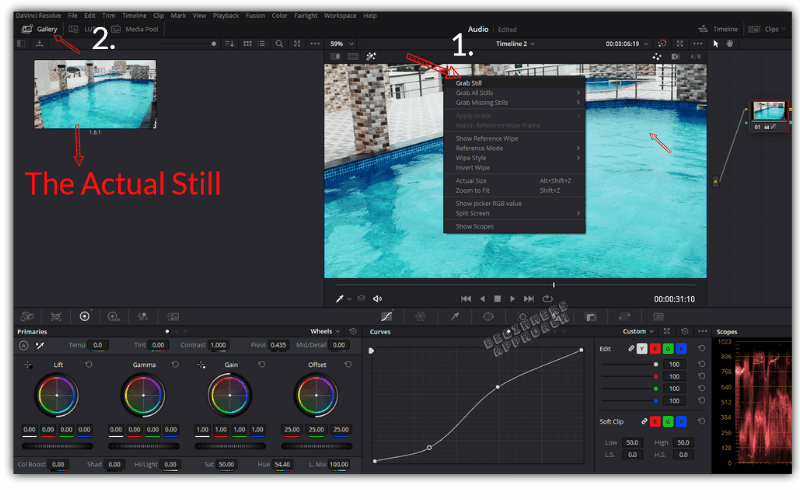
How to Take a Still from a Video in DaVinci Resolve?
Grabbing a however in DaVinci Resolve is easy.
- Nether the "Edit" page, select your desired video clip.
- Get to the "Color" page.
- Correct-click on the viewer and select "Grab Still".
- Click on the "Gallery" tab to reveal the screenshot.
How to Consign an Epitome in DaVinci Resolve?
- After grabbing a all the same from the video clip on the "Color" page, click on the "Gallery" tab.
- Locate your withal and right-click information technology.
- Select "Export".
- From the "Consign Stills" window, cull your destination folder to save the yet.
- Enter a proper name in the "Export" field.
- Select an extension (let'southward say, png or jpg) from the "Salvage as blazon" dropdown.
- Click on "Export".
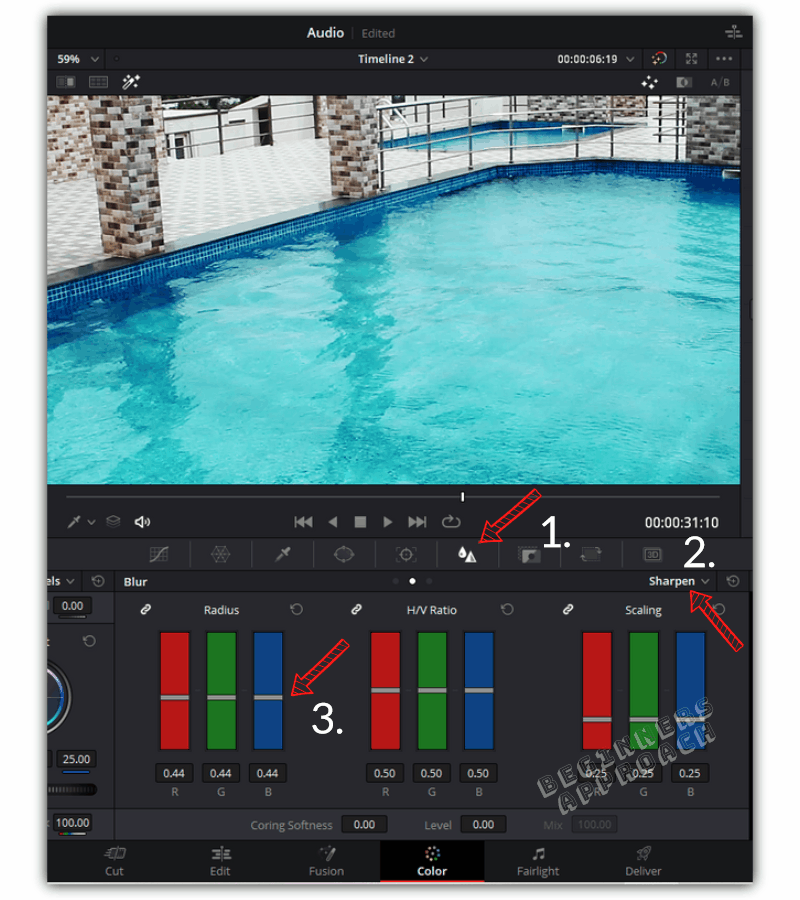
How to Acuminate Prototype in DaVinci Resolve?
- Under the "Edit" page, Import your desired prototype and place information technology on a timeline.
- Go to the "Color" folio.
- Click on the "Blur" push button.
- From the right side dropdown, select "Sharpen".
- Adjust the "Radius" knob to, say 0.44, to get some good sharpening.
- Play with other settings till you get your desired result!
You may exist also interested in the below posts:
DaVinci Resolve Picture in Picture (How to Exercise Quickly!)
How to Fade Clips in DaVinci Resolve (in Less than 30 sec)
Zoom Techniques in DaVinci Resolve (Each Under two Minutes!)
Does DaVinci Resolve Back up Gif? (Here's How to Work With Them)
All Near Audio & Video Clips' Link in DaVinci Resolve (Must Read!)
Change Aspect Ratio in DaVinci Resolve: (Cinematic Look)
DaVinci Resolve Copy & Paste: (Quick Tips to Save a Ton of Time)
Source: https://beginnersapproach.com/davinci-resolve-stills-images/#:~:text=DaVinci%20Resolve%20is%20Unable%20to,then%20import%20inside%20DaVinci%20Resolve.
0 Response to "why wont a png upload into davinci"
Post a Comment